Total Pageviews

Showing posts with label healthy. Show all posts

Sunday, March 18, 2012

Fruit Kabobs - St. Patties Day Celebration (Pt.3)

These little guys were a little time consuming, but well worth it!
Since I've been calorie conscious lately, I wanted to offer some healthy options along with all the junk food that I was serving. So I made up these fruit kabobs, along with a green veggie plate (Green Peppers, Cucumbers, Celery) and veggie dip.

The only set-back to this snack is that it takes a awhile to cut up all the fruit. Also, it took me about a half hour in the store to find the skewers!! I figured they'd be with the paper plates, and disposable plastic-ware.. Nope. They were on the other ride of the store (wal-mart super center) with the kitchen-wares!! What!?

Not only is this snack good for you, but it's also good for your wallet!

Try this simple snack and make it your own by adding whatever green fruits YOU like!


What You Will Need:

  • 1 Green Apple ---------- .80
  • 1 Honeydew Melon ---- 2.00
  • 5 Kiwi's ----------------- 1.70
  • 1/2 Lb. Green Grapes -- .69
  • 25ish Skewers ----------- .25 (100 Pack for .97)
Total: 5.44

Pin It

Thursday, March 15, 2012

Cauliflower Pizza Crust

Cauliflower pizza crust, it's all the buzz with my friends right now!! I found this recipe where I find almost all of my recipes, Pinterest! I have never been a fan of cauliflower, as I mentioned in my Pureed Cauliflower post a few weeks ago. But I'm always wanting to try new things, especially if they're good for me! Perhaps the best part about this recipe, it's SUPER easy!!

I made this for my husband last week, and he had no idea it was cauliflower! He simply told me, "This is one of the best pizzas I've ever had". The very next day I had a friend over and made it for us for lunch- she tried to taste the cauliflower, and couldn't! This recipe is a winner for sure. I will be making this on a regular basis!


When I made this I had a half head of cauliflower sitting my fridge that I needed to use up, and had hoped that it would be enough- and it was more than enough. You only need 1 cup of cauliflower, and my half head made 2 pizzas with a little left over.


Now I don't want to go and tell you that this is just like regular pizza crust, because since it is made with cauliflower, and no flour- it's a little soft. I had to eat my first piece with a fork, and once the other piece cooled I was able to pick it up but it was still a little too soft for me. I just used a fork for both pieces.


cauliflower crust pizza

Serves 2; Adapted from Your Lighter Side.

ingredients:

1 cup cooked, riced cauliflower
1 cup shredded mozzarella cheese
1 egg, beaten
1 tsp dried oregano
1/2 tsp crushed garlic
1/2 tsp garlic salt
olive oil (optional)

pizza sauce, shredded cheese and your choice of toppings*

directions:

To "Rice" the Cauliflower:
Take 1 large head of fresh cauliflower, remove stems and leaves, and chop the florets into chunks. Add to food processor and pulse until it looks like grain. Do not over pulse it or you will puree it. (If you don't have a food processor, you can grate the whole head with a cheese grater). Place the riced cauliflower into a microwave safe bowl and microwave for 8 minutes. There is no need to add water, as the natural moisture in the cauliflower is enough to cook itself.

One large head should produce approximately 4 cups of riced cauliflower. The remainder can be used to make additional pizza crusts immediately, or can be stored in the refrigerator for up to one week.

To Make the Pizza Crust:

Preheat oven to 450 degrees. Spray a cookie sheet with non-stick cooking spray.

In a medium bowl, stir together 1 cup cauliflower, egg and mozzarella. Add oregano, crushed garlic and garlic salt, stir. Transfer to the cookie sheet, and using your hands, pat out into a 9" round. Optional: Brush olive oil over top of mixture to help with browning.

Bake at 450 degrees for 15 minutes.

Remove from oven. To the crust, add sauce, toppings and cheese. Place under a broiler at high heat just until cheese is melted (approximately 3-4 minutes).

Enjoy!

*Note that toppings need to be precooked since you are only broiling for a few minutes.

Note for those that don’ t have a microwave:

You can steam the florets on the stove before ricing them. The texture/consistency won’t be the same (It will be more like a puree) but it still works fine once you mix all the ingredients together!


Nutritional Information for the entire crust:
calories: 434, fat: 25 g, carbohydrates: 8 (net), 13 if counting all, fiber: 5 g, protein: 41 g.

Nutritional Information for one serving: 109 calories, 7 grams fat, 2 net carbs, 1.5 grams fiber, 10 grams protein.


Pin It

Friday, March 9, 2012

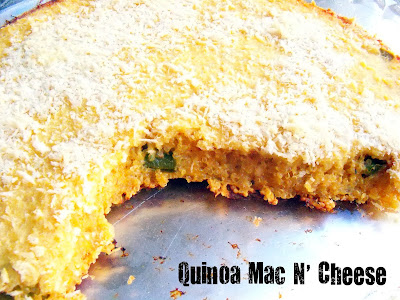
Quinoa Mac N' Cheese

Quinoa Mac n’ cheese, a delicious & healthy meal. Delicious because it’s full of cheesy goodness, and healthy cause quinoa is filled with protein! Healthy really does = Happy. I bought a small bag of quinoa a few weeks ago to make Blueberry Breakfast Quinoa. I was not impressed, but still wanted to use up the rest of the quinoa (waste not, want not)! So I searched and searched for a mouthwatering recipe on Pinterest, and this is what I found. Quinoa Mac n’ Cheese!


First I sauteed up the veggies. Rinsed and then added the quinoa & gralic to them, and let it cook for about 3-5 mins uncovered. I then added the water to it once it started to turn opaque. Pour in the water & salt, and simmer for about 5-10 mins. Turn off heat and let sit for 5 mins. Pre-heat the oven to 350, and while it's heating- whisk up the eggs & milk in a large bowl. Then fold in the quinoa mixture and Cheese, until well mixed and some of the cheese is melted.


After I mixed everything together- I sprayed the dish with olive oil spray, and poured it into a glass pie dish (I cut the recipe in half, it's just me and my husband). Topped with panko bread crumbs & a little shredded cheese. Popped it in the oven & and let it toast up for about 30-35 mins till everything is melty & heated through. A bit brown around the edges will tell you it's done!


The veggies I added are- red peppers, green peppers, yellow onions, zucchini, fresh tomato, and yellow squash. What can I say, I love my veggies! And anyone that knows me, knows that I don’t like to spend money. So I know you’re probably thinking- “All those veggies aren't in season this time of year, and can be expensive!” When you go to your local supermarket, look for a little sale rack/area in the produce section. Some stores try to make their money back by marking down veggies before they are about to expire, and hide them in the back. I got all my veggies for under $3!


This mac n’ cheese isn’t your typical mac n’ cheese (for obvious reasons- no noodles), but it’s also not incredibly moist. The quinoa kinda soaks up all the moisture. So what I did, and would recommend is just a dollop if sour cream on each serving. Next time I might try adding a little chicken broth before I pop it in the oven.


You can add whatever toppings you want to 'make it your own'- Bacon bits, extra cheese, sour cream, hot sauce, scallions, you get the idea!


Quinoa Mac N’ Cheese

Recipe adapted from Monica Nelson Fitness.

Serving Size: Can serve 6-8
Ingredients
  • 2 tsp olive oil
  • 1 med. onion
  • 1/2 cup diced tomato, or red/green pepper
  • 1 1/2 cups quinoa, rinsed and drained
  • good pinch of salt
  • a few grinds of seasoning salt
  • 2 cloves garlic, minced
  • 2 large eggs
  • 1 cup soy milk, non-fat milk, or milk of choice
  • 1 1/2 cups grated Cheddar cheese, more for sprinkling
  • Optional- Crushed Red Pepper, Panko Bread crumbs for topping
  • Toppings (optional)- salsa, hot sauce, sour cream, scallions (you get the picture)
Directions
  1. Heat oil in med. saucepan over med. heat. Add leek and tomatoes (or bell peppers-or any veggies you want really); cover and cook 5 mins or until tender. Stir in quinoa and garlic, and cook, uncovered, 3-4 mins, or until grains start to turn opaque. (They will not fully be cooked yet.)
  2. Add 3 cups water and season with salt and the Seasoning Salt (I like Lawry's or Everyday Seasoning). Cover and reduce heat to med-low and simmer 5-10 more, or until most liquid has been absorbed. Remove from heat and let stand 5 mins.
  3. Preheat oven to 350 F. Coat 13x9 inch dish with cooking spray. Whisk together eggs and milk in large bowl. Fold in quinoa mixture and cheese. Stir very well and let some of the cheese melt. Transfer to prepared baking dish and if using Panko Crumbs or Bread crumbs add now and bake 30-35 mins, (or until browned around edges.)
  4. Now you can toss with many toppings, some ideas: salsa, scallions, sour cream, and hot sauce! I serve with a side of steamed broccoli or a salad and a nice slice of good hearty bread.
NOTE: Many readers wanted to know how many Calories this AMAZING meal has. Divided into 6 servings: 339 Calories per serving.

Pin It

Tuesday, March 6, 2012

Breakfast Blueberry Quinoa


Quinoa, a grain that I had only tried once before- and not been impressed with. I tried it in a pre-packaged savory salad, when I worked salad bar prep. at a local grocery store. So I figured if I made it fresh myself, it would be better. This recipe is close to oatmeal, and I LOVE oatmeal- How could this go wrong?! Well, I have to tell you- I was not impressed with this recipe. Although since it was my first time making quinoa, I may have not rinsed enough or something.. (I made quinoa mac n' cheese a week later and is was delicious!) In this recipe the quinoa tasted kind of bitter, so I will be trying this recipe again soon to see if anything changes. Quinoa is so good for you, and is high in protein! I really want to like it, and start eating more of it!


Usually served in savory side dishes, quinoa -- a high-protein seed -- also makes a wonderful hot cereal.

Martha Stewart Living, February 2010
Yield Makes 2 cups
Ingredients
2 cups whole or low-fat milk, plus more for serving
1 cup quinoa, rinsed
3 tablespoons light-brown sugar, plus more for serving
1/8 teaspoon ground cinnamon, plus more for serving
1 cup (1/2 pint) fresh blueberries, plus more for serving
Directions
1. Bring milk to a boil in a small saucepan. Add quinoa, and return to a boil. Reduce heat to low, and simmer, covered, until three-quarters of the milk has been absorbed, about 15 minutes.
2. Stir in sugar and cinnamon. Cook, covered, until almost all the milk has been absorbed, about 8 minutes. Stir in blueberries, and cook for 30 seconds. Serve with additional milk, sugar, cinnamon, and blueberries.

Recipe adapted from Martha Stewart.

Pin It

Wednesday, February 29, 2012

Pureed Cauliflower & more!


Being a nanny, I don't get home much before the sun sets- meaning I don't usually get the privilege of making dinner for me and my husband. On the rare occasion I do get to come home as the sun goes down (6:30ish), which means I get to make a late dinner!! And last night, was one of those nights! I was feeling adventurous, and wanted to try something I had never done before (along with the same old, same old).


I made pan-fried Chicken with a drizzle of Wildtree bacon flavored grape seed oil (to purchase some for yourself, click on the link at the bottom of this post), a sprinkle of paprika, pink Himalayan salt, and some good old fresh ground pepper. Put it in the oven for a bit to keep warm while I cooked the rest of the meal.


Sauteed/caramelized veggies- zucchini, yellow squash, and cherry tomatoes! I drizzled a little roasted garlic grape seed oil, and just a bit of pink Himalayan salt. Superb!


And last but certainly not least- the exciting dish! Pureed cauliflower.


Now I know what you're thinking.. "That just sounds disgusting! Not exciting." Well if you use your imagination, it tastes like healthy mashed potatoes. In fact, my husband had no idea it was cauliflower until I told him- he thought it was mashed potatoes. Since cauliflower has such a bland taste to begin with, it pretty much adapts to whatever flavor you mix in with it.


I began preparing it by washing, and cutting it into pieces a little smaller than the size of a serving spoon. Boiled with a few cloves of garlic until super tender- about 20 mins, and drained really well (I think next time I may try to pat it dry with a paper towel. Mine was a little watery). The aroma is a little strong, and not in a good way.. But it's well worth it!


After draining, I dumped all of the cauliflower into my kitchen aid mixer, and mixed it with the whisk attachment until smooth. (I bought my mixer for myself on black friday, and I have never since regretted it.) If you don't have a kitchen aid, a hand mixer will work just as well. I prepared it as I would mashed potatoes, adding a few naughty ingredients. A dollop or 2 of sour cream, a slash of milk (1-2 Tbsp.), a few pats of butter, Himalayan salt & pepper to taste, garlic salt to taste, and some ranch dressing.


And let me tell you , it was delish!!! And I've never been a fan of cauliflower.


Pureed Cauliflower

Yield: Serves 2-4

Ingredients:

1/2 head of Fresh Cauliflower

3-4 cloves of Garlic

1-2 heaping Tbsp. Sour Cream

1-2 Tbsp. Milk

Salt, pepper, garlic salt- to taste

2-3 Tbsp.- Real Butter

1 Tbsp.- Ranch Dressing


directions:

1. Wash. Cut. Throw into a pot of water with 2-3 cloves of garlic & boil.

2. When done (About 20 mins.), drain really well & puree with an electric mixer.

3. When pureed, add whatever you want really. I added sour cream, ranch dressing, milk, garlic salt, fresh ground pepper, pink himalayan salt, and butter

4. Serve warm.


To purchase some Wildtree grape seed oil, or any of their other all natural products, click here to get in touch with my local Wildtree representative- my mom!! Susan Brady.

Until next time- Keep cooking. Try new things. And tell me all about it!


Pin It

Sunday, February 26, 2012

Broiled Grapefruit

Lately my husband and I have been trying to eat healthier & work-out more to prepare our bodies for a Florida vacation in just a few months.. Which isn't that hard for me because I LOVE fruits & veggies! The working out is what's killing me..


An addition to my diet lately has been grapefruit for breakfast (My husband says it takes too long to eat a grapefruit, which means I got to eat all 6 of them by myself). It's an easy, very inexpensive, and super healthy breakfast! Normally I like mine with no sugar- just plain old grapefruit. After eating so many, I was getting tired of the same 'plain old grapefruit'- I wanted to try something different! I saw this on Pinterest, and I just couldn't resist! Broiled Grapefruit!! Sounds weird, right? I was slightly hesitant about it because warm grapefruit.. I mean really, that just sounds kinda odd. Odd enough for me to be curious and try it for myself. It was surprisingly tasty!


I cut the grapefruit in half, and drizzled it with a little agave nectar! I also sprinkled a little cinnamon sugar, and a pinch of nutmeg. Placed the grapefruit under the broiler for a few minutes, and when the sugar starts to crystallize- that's when you know it's ready!
Try it out, and let me know what you think!


Broiled Grapefruit

Yield: Serves 1-2

Ingredients:

1 large grapefruit, cut in half
Drizzle of agave nectar OR Honey
Sprinkling of Cinnamon Sugar

directions:

1. Turn on the oven broiler. I set mine at high temperature.

2. Using a pairing knife, cut all the way around the grapefruit and between the fruit and the rind. Try not to cut all the way through the bottom rind, you want to keep the juices. Drizzle agave nectar lightly over the grapefruit halves. Sprinkle with cinnamon sugar.

3. Place the grapefruit halves on a baking sheet. Put in the oven, under the broiler for 2-3 minutes, just until the sugar is bubbling and crystallized.

4. Serve warm.

*Note-you can use honey instead of agave or brown sugar instead of Cinnamon sugar.*

Recipe originally adapted from http://www.twopeasandtheirpod.com/broiled-grapefruit-recipe/


Pin It

Saturday, February 25, 2012

The first day of the rest of your cooking life!


Hi everyone! My name is Allie, and anyone that knows me knows that I LOVE to cook! I've wanted to start a food blog for months, and I've finally brought myself to do it! Even though I am newly married, and have 2 jobs- my very favorite thing to do it cook, bake, and ALWAYS try new foods when given the opportunity. So here I go! If you have any recipes that you would like to see me make, let me know in the comment box below- I'm always open for new ideas! My purpose for this blog is not only for fun, but to show you that cooking doesn't have to be a hassle, unhealthy, or takes hours in the kitchen. I hope you join me on this journey!
Pin It