Total Pageviews

Thursday, August 16, 2012

Super Simple Crab Rangoon

Crab Rangoon

Crab Rangoon. Such an easy food to make, and yet this was my first time! Although this was easy as far as few ingredients, and simple steps. I will have to invest in an electric deep fryer before I make them again. The oil was splattering all over the place, and the pot I fried them in took about a half hour to get clean. But these were sure worth it!! In fact they were so good that I forgot to take any 'after pictures'. 
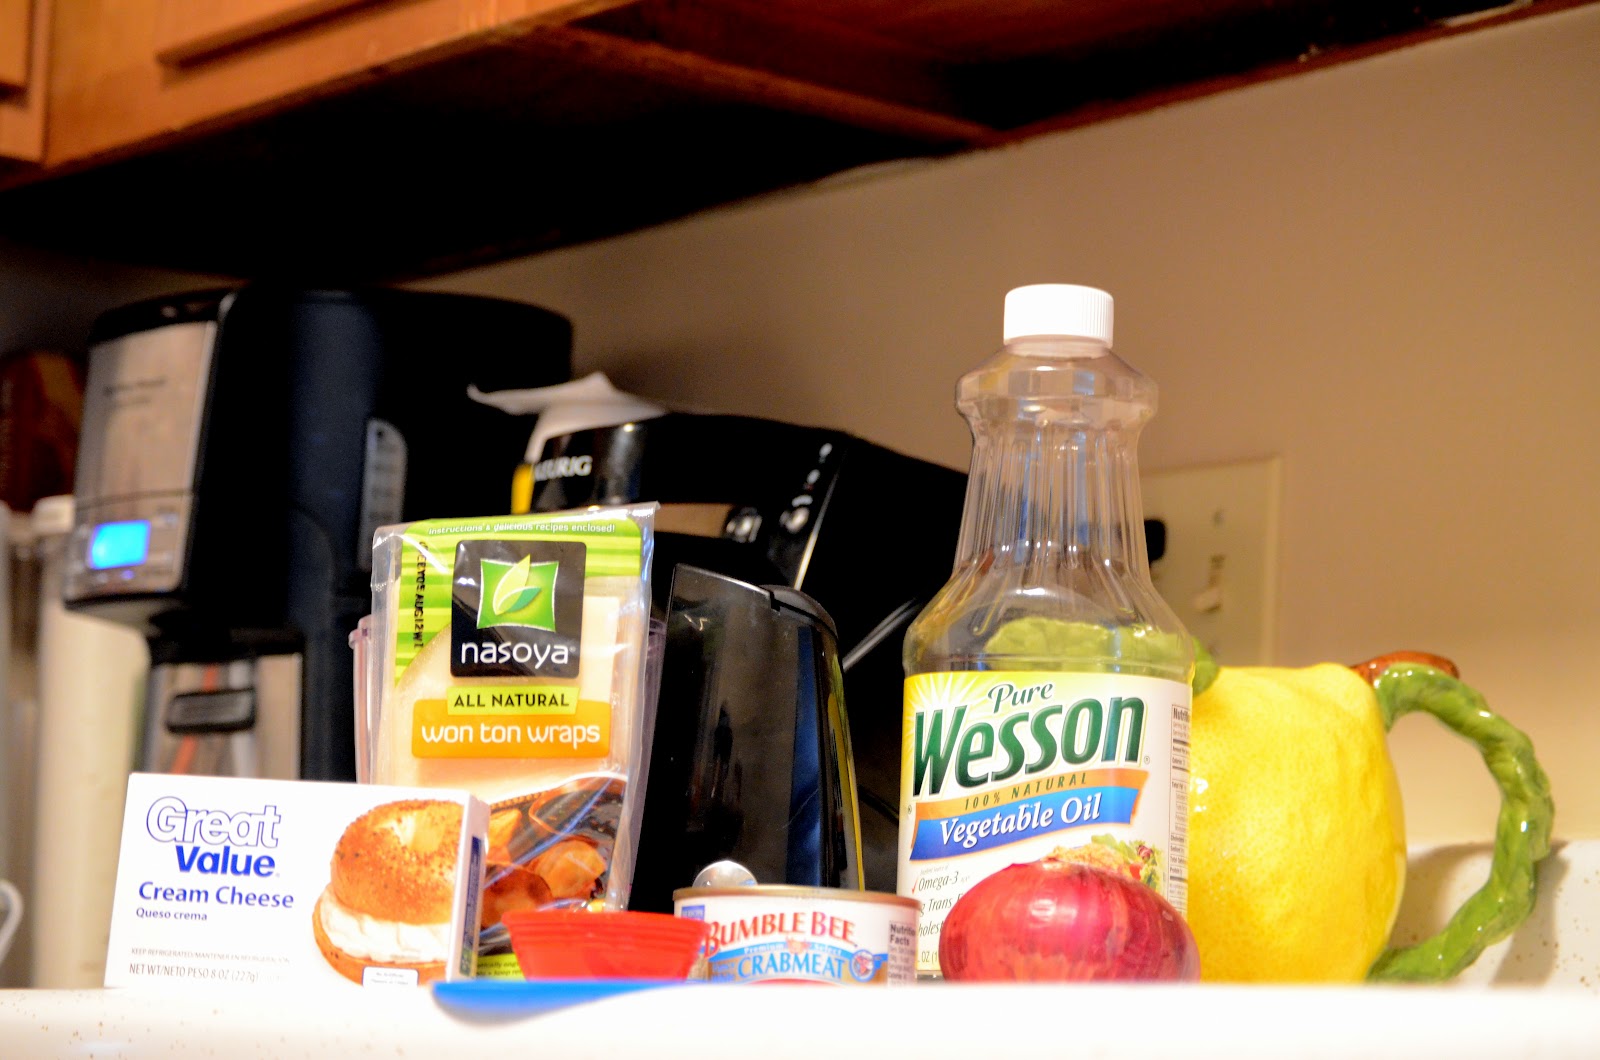


INGREDIENTS:

  • 6oz. Can- White Crabmeat
  • One Half- Red Onion
  • 8oz. Block- Cream Cheese
  • Half Package- Won Ton Wrappers (About 20 Wrappers)
  • 1 Bottle- Vegetable Oil 
  • Small Dish Of Water- To Seal The Won Tons Closed 
  • 1/4 - 1/2 t.- Garlic Salt (Whatever tastes right to you)


As you can see I decided to do triangles, but you can do any shape you want!

1. Put the entire bottle of Vegetable Oil in a large pot, and turn on Med-Hi. You want it to be just slightly bubbling when you put the Crab Rangoon in.

2. In a food processor (I used a small one) combine and mix- 
                Small diced Red Onions, Crabmeat (Drained), Cream Cheese, Garlic Salt.

3. Separate Won Ton wrappers and fill with about 1 T. of crab mixture. You don't want to over fill them or they'll explode while they're cooking, and oil will go everywhere. 

4. Dip your index finger in the small dish of water, and wet the edges of the wrapper, and fold the edges together to seal the pocket. 

5. Gently drop the Rangoon in the HOT oil, and turn over after about 20-30 seconds. They'll stay in the oil for a total of about 1 minute, depending on the temperature of your oil.

6. When you take them out of the oil, place them on a plate lined with paper towels to soak up all the excess oil.

7. Enjoy!! 

I didn't make any sauce because not only was this my first time making them, but it was also my first time eating them, and I didn't know you were supposed to eat them with sauce. They were so tasty on their own though!! 

Make this recipe your own, and let me know how they turn out!! 


Wednesday, May 16, 2012

Chocolate Chunk Cake Brownies

Chocolate Chunk Cake Brownies
Courtesy of Better Homes & Gardens Bridal Edition Cookbook

Now I have to admit.. I have never made brownies from scratch before! This was a treat that was easy to make, and well, well worth it!


Before you get started- read ALL the directions, and grab ALL the ingredients! Before you start mixing everything together! 

Step 1. Pre-heat oven to 350 degrees F. Grease 15x10x1 (or 9x13x1) pan. Melt Butter completely in microwave safe bowl for 1 1/2-2 minutes.


 Step 2. Stir in Cocoa powder and Sugar until combined. Add Eggs and Vanilla. Using a wooden spoon, beat lightly just until combined. 

Step 3. In a small bowl combine Flour, Baking Soda, and Baking Powder. Alternately add flour mixture and milk to chocolate mixture, beating after each addition. (As you can see 2 pictures above. I mixed the flour mixture with the milk, and then mixed that with the chocolate mixture. Also, I clearly did not use a wooden spoon like they call for, a whisk worked just fine.) Stir in Chocolate Chunks.

Step 4. Pour batter into prepared baking dish. Since I did mine in a 9x13x1 it took about 30 mins to bake. However, the recipe says it should only take 15-18 mins @ 350 degrees F. if you use a 15x10x1.

Step 5. Enjoy! I enjoyed mine hot out of the oven with a scoop of vanilla ice cream on top.
Ingredients:
  • 3/4 C.- Butter
  • 1 1/4 C.- Sugar
  • 1/4 C.- Dark Unsweetened Cocoa Powder
  • 1/4 C.- Regular Unsweetened Cocoa Powder
  • 2- Eggs
  • 1 t.- Vanilla
  • 1 1/2 C.- All-Purpose Flour
  • 1 t.- Baking Powder
  • 1/4 t.- Baking Soda
  • 1 C.- Milk
  • 1 C.- Chocolate Chunks


Saturday, April 28, 2012

Baked Eggs in Whole Roasted Tomatoes

Baked Eggs in Whole Roasted Tomatoes


I recently started getting a magazine in the mail called whole living. I wasn't too impressed with the magazine overall, but the recipe section has proved to be a winner. While glancing through it, this recipe popped out at me! 

 These are simple, tasty, and best of all- healthy! 

Although they are simple, they were still pretty tricky to make. Scraping out the insides of the tomatoes with out poking a hole through the side is quite difficult. For me at least. So I would not recommend this recipe for beginners.

This is the second time I've made these, and both times the tomatoes have split on the sides. I'm not sure what I'm doing wrong. I'm thinking it may have something to do with my oven not being level, therefore putting more pressure on one side of the tomato and causing it to crack..? Then again, that may just be an excuse for my poor cutting skills.

 Either way, they may not be incredibly pleasing to the eye, but they sure are to your taste buds! 


    Ingredients Serves 2
  • 2 large tomatoes
  • 2ish tablespoons extra-virgin olive oil
  • Coarse salt and ground black pepper
  • 1/2 Tbsp. Tuscany Bread Dipper (Wildtree) Thyme can be used in replacement.
  • 2 large eggs

Directions

  1. Heat oven to 400 degrees. Slice the top third off tomatoes and use a small spoon to remove core and seeds. Arrange in a baking dish, drizzle with oil, and season with salt and pepper. Sprinkle with seasoning (Thyme). Roast until tomatoes are tender and caramelized, about 30 minutes.
  2. Crack an egg into each tomato and season with salt and pepper. Bake until eggs are just set, 7 to 9 minutes more.

    Recipe adapted from  Whole Living

Saturday, April 14, 2012

Real Vanilla Bean Cupcakes with Strawberry Whipped Cream Topping

Real Vanilla Bean Cupcakes with Strawberry Whipped Cream Topping
So it's Easter time, and I wanted to make something extra special for the Special day. I had seen this recipe a long while ago (probably in the fall), and wanted to make them. Not only because they looked and sounded delicious, but because I had gotten some vanilla beans for a bridal gift last spring and needed to use them up on something scrumptious!

This was only the second time I've ever made a cake from scratch. Growing up my mom was never a fan of baking (and still isn't), so we always did boxed cakes & brownies. Which are tasty, but just not the same as the real deal!
(You'll have to forgive me for the poor pictures. I made them at midnight, and the lighting was terrible. So I had to snap a few pictures the next day.)

These were the tastiest, most moist, heavenly cupcakes I've ever had!! And I don't even like cupcakes.

The Ultimate Vanilla Cupcake Recipe

Yield: 16 cupcakes
  • 1 cup granulated sugar
  • 1 vanilla bean
  • 1 3/4 cups flour
  • 1 1/2 teaspoons baking powder
  • 1/2 teaspoon baking soda
  • 1/2 teaspoon salt
  • 1/4 cup unsalted butter, room temperature (I used salted)
  • 2 large eggs, room temperature
  • 1/3 cup sour cream
  • 1/4 cup canola oil, vegetable oil, or olive oil
  • 1 tablespoon vanilla extract
  • 2/3 cup 2% or whole milk
  1. Preheat oven to 350 F.
  2. In a small bowl, combine sugar and seeds from the vanilla bean.
  3. Using the back of a spoon, move around the bowl and apply pressure to break up any clumps of seeds and to better infuse the vanilla flavor into the sugar. Then mix very well in with an electric mixer. Set aside.
  4. In a medium-sized mixing bowl or bowl of a stand mixer, mix together cake flour, baking powder, baking soda, and salt.
  5. Add the vanilla bean sugar and mix until well combined.
  6. Add butter and mix on medium-low speed for three minutes. Because there is so little butter, you'll end up with a very fine crumb texture.
  7. In a small mixing bowl, whisk together eggs, sour cream, oil, and vanilla extract until smooth.
  8. Add the egg mixture to the flour mixture and beat on medium speed until just combined.
  9. Slowly add milk and mix on low speed until just combined. The batter will be liquid. (Don't worry, you didn't do anything wrong. It's supposed to be that way.)
  10. Spray the cupcake liners. Fill just over 1/2 full.
  11. Bake for 14 minutes and then test to see if they are done. They are done when a toothpick comes out without wet batter stuck to it. The cupcakes should appear white with specks of vanilla bean. They should not turn a golden brown. If they are not done, test again in two minutes. If they are still not done, test again in another two minutes. (Mine took 16-18 mins.)
  12. When the cupcakes are done, remove them immediately from the tins and leave them on a cooling rack (or just on your counter if you don't own a cooling rack) to cool.
  13. Remove from greasy cupcake liners, and put into new ones.
Recipe adapted from: Cupcakeproject.com


As for that delicious Strawberry Whipped Cream Topping, it was incredibly easy to make! Just 5 minutes, and you're done!

Strawberry Whipped Cream Recipe
  • 1 cup heavy whipping cream
  • 1/3 cup sugar
  • 4 tablespoons food processed strawberries (take some fresh strawberries, wash them, remove the stems, and throw them in the food processor until they become a thick, seedy liquid)
  1. Whip cream until it looks like whipped cream.
  2. Mix in sugar.
  3. Mix in strawberries until just combined.
  4. Be sure to frost your cupcakes before you eat all of the strawberry whipped cream.


Recipe adapted from: Cupcakeproject.com

Saturday, March 31, 2012

French Toast Casserole

The Famous French Toast Casserole!

Although I wish I could take credit for this incredible recipe, I cannot. I've made it a few times, and it has been a big hit! Paula Dean is to thank for this tasty recipe. And those of you who know Paula, know that this is definitely NOT one of the healthier dishes that I make.

It's so tasty that even if you're on a diet, you'll find an excuse to splurge for this breakfast treat! French toast has always been a breakfast favorite of mine, so to make huge pan of it and top it with praline.. Pure bliss.

Did I mention it's super simple to make? Well, it is!

Ingredients:

Dash - salt
1/2 t. - Pumpkin Pie Spice
1/2 t. - Ground Cinnamon
1 T. - Vanilla Extract
2 T. - Sugar
1 3/4 C. - Milk
8 - Large Eggs
1 C. - Half-and-Half
Butter, for pan
1 Loaf – Your Favorite Bread (Cinnamon Raisin is very tasty)
Praline Topping, recipe follows

Directions:

Place slices in a buttered 9x13 casserole dish in 2 rows, overlapping the slices.

In a large bowl, combine the eggs, half-and-half, milk, sugar, vanilla, cinnamon, nutmeg and salt and beat with a hand mixer or whisk until blended but not too bubbly. Pour mixture over the bread slices, making sure everything is covered evenly with the milk-egg mixture. Spoon some of the mixture in between the slices. Cover with foil and refrigerate overnight.

The next morning, the egg mixture will be mostly soaked into the bread. Preheat oven to 350 degrees F. Spread Praline Topping evenly over the bread and bake for 45 minutes, until puffed and lightly golden. Serve with maple syrup & Butter.

Praline Topping:
1/2 lb. - (2 sticks) Butter
1 C. - Packed Light Brown Sugar
1 C. - Chopped Pecans (Optional)
2 T. - Light Corn Syrup
1/2 t. - Ground Cinnamon
1/2-t. - Ground Nutmeg

(I never have pecans on hand, so I’ve never added them.)
Combine all ingredients in a medium bowl and blend well. Spread over bread as directed above.

Recipes adapted from Pauladeen.com


Saturday, March 24, 2012

Shamrock Shake (Mint Chocolate-chip)- Gluten-free, Soy-free, Sugar-free.

Shamrock Shake!! (Mint chocolate-chip)
Gluten-free, Soy-free, Sugar-free


Who doesn't like a Mint Chocolate-Chip shake? Especially around St. Patrick's Day! And the best part about this shake is that it's really healthy, so you don't have to feel guilty about drinking it!

Here is what your shake will look like before you mix it up! Kinda scary, I know- but it tastes delish!

Ahh, the finished product! Refreshing green!


Ingredients:

  • 1- Frozen Banana (As ripe as possible! Like the ones you'd freeze for banana bread!)
  • 1 handful- Chocolate chips (I don't like chocolate-chips so I just used 1 Tbsp. Cocoa Powder)
  • 2 drops- of pure peppermint extract
  • 1/4 cup- Frozen Spinach (If you just can't do the spinach, green food coloring will also do. However, I couldn't taste it at all!)
  • 2/3 cup- Milk of your choice

Blend it all together and you're done!!

Disclaimer: As far as the mint extract goes, I don't have a dropper so I just eyeballed it, and I didn't really taste much mint. So I added some more, and of course it was wayyyyy too much! I wasn't sure what I could add to cut the mint, but after a little thought- I decided that 2 Tbsp. of natural peanut butter should work! And it did! My shake was tasty!!
This is what the finished product looked like!


Sunday, March 18, 2012

Fruit Kabobs - St. Patties Day Celebration (Pt.3)

These little guys were a little time consuming, but well worth it!
Since I've been calorie conscious lately, I wanted to offer some healthy options along with all the junk food that I was serving. So I made up these fruit kabobs, along with a green veggie plate (Green Peppers, Cucumbers, Celery) and veggie dip.

The only set-back to this snack is that it takes a awhile to cut up all the fruit. Also, it took me about a half hour in the store to find the skewers!! I figured they'd be with the paper plates, and disposable plastic-ware.. Nope. They were on the other ride of the store (wal-mart super center) with the kitchen-wares!! What!?

Not only is this snack good for you, but it's also good for your wallet!

Try this simple snack and make it your own by adding whatever green fruits YOU like!


What You Will Need:

  • 1 Green Apple ---------- .80
  • 1 Honeydew Melon ---- 2.00
  • 5 Kiwi's ----------------- 1.70
  • 1/2 Lb. Green Grapes -- .69
  • 25ish Skewers ----------- .25 (100 Pack for .97)
Total: 5.44

Pin It